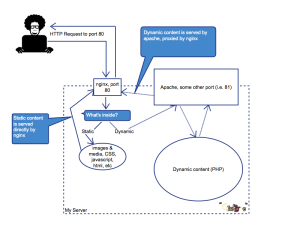
There could be many reasons why your website performance is poor, one of them can possibly be that Apache is not coping with the load. There is a simple way to offload Apache by configuring nginx to serve static content.

Nginx is also a web server (as Apache and IIS) and can be used on its own, but often it is used just as a proxy server. Since it is much more light weight than Apache (meaning it uses just a fraction of resources Apache uses to perform the same task), it makes sense to let nginx serve all static content (images, javascript, css, html, css, etc) to offload Apache. Apache then will be busy with more important jobs, such as generating dynamic content.
You can ask, why not to use nginx to serve everything if it needs much less resources? My understanding is that nginx is not designed to perform complicated tasks, it’s job is to do simple things, but fast and resource-wise cheap. On this schema nginx is solely responsible for delivering all static content to the user, and also being a proxy for the dynamic content generated by apache:
Of course it is possible to configure nginx to serve static content not only for Drupal sites, but below nginx config files are Drupal-specific. You can use this configuration for the case you host only one site on your server/VPS and also for the case when there are several websites (domains) on this server (which can be configured as virtual hosts on Apache level).
So let’s start:
1. Install nginx, the easiest way is to use packages, for example for Ubuntu the command will be
apt-get install nginx
2. Make sure Apache is configured to run on some other port, i.e. port 81 (I’ll be using 81 in all my examples below). Depending on your installation and configuration, you may need to change one or more files, but usually it is either apache2.conf, httpd.conf or ports.conf. Just look for the following line of code:
NameVirtualHost *:80
Listen 80
If you are using Virtual Hosts, the port should be changed there as well.
<VirtualHost *:80>
…
</VirtualHost>
80 should be changed to 81 in all the above examples.
3. Nginx main configuration file is called nginx.conf, but it is more logical to split the configuration into several files:
nginx.conf includes general server-wide configuration that should apply to all sites hosted on this machine
user www-data;
worker_processes 8; #one process per CPU, so if your server has 8 CPUs, write 8 here.
timer_resolution 100ms;
worker_rlimit_nofile 16384;error_log /var/log/nginx/error.log; #error log location
pid /var/run/nginx.pid;events {
worker_connections 2048;
use epoll;
}http {
include /etc/nginx/mime.types;
default_type application/octet-stream;
access_log off;
sendfile on;
keepalive_timeout 65;
tcp_nodelay on;gzip on;
gzip_types text/plain application/xml+rss text/javascript application/javascript application/x-javascript text/css text/xml application/xml;server_tokens off;
client_max_body_size 1000M;include /etc/nginx/conf.d/*.conf;
include /etc/nginx/sites-enabled/*;
}
sites-enabled/00-nginx-default – default server, this configuration will be used in case current domain does not match specific domains. Using this configuration nginx will pass ALL requests to Apache, doing basically nothing. It can be useful, if for example you’d like to install phpmyadmin or some other tools on a different domain/subdomain for security purposes and easier administration (which means that there won’t be big load passing through this configuration).
server {
listen 80 default; #this is here it says nginx is running on port 80
server_name _;
root /var/www;access_log /var/log/nginx/default.access.log;
location /nginx_status {
stub_status on;
access_log off;
allow 127.0.0.1;
deny all;
}location / {
proxy_set_header Host $host;
proxy_set_header X-Forwarded-For $proxy_add_x_forwarded_for;
proxy_pass http://localhost:81; #apache is on port 81
}
}
Domain specific configuration will go into a separate file for each domain:
server {
server_name mysite.com;root /var/www/mysite; #document root for your site
access_log off; #for production environment; for testing you can enable itlocation ~* \.(htm|html)$ {
error_page 404 = @imagecache;
proxy_cache_valid 200 302 10m;
proxy_cache_valid 404 1m;
access_log off;
expires 2m;
}# serve static files directly
location ~* \.(gif|jpg|jpeg|png|wmv|avi|mpg|mpeg|mp4|js|css|mp3|swf|ico|flv|htm)$ {
error_page 404 = @imagecache;
proxy_cache_valid 200 302 10m;
proxy_cache_valid 404 1m;
access_log off;
expires 30d;
}# ImageCache work arounds
location ~ ^/sites/.*/files/imagecache/ {
try_files $uri @rewrite;
}location @imagecache {
client_max_body_size 50m;
client_body_buffer_size 128k;
proxy_send_timeout 90;
proxy_read_timeout 90;
proxy_buffer_size 4k;
proxy_buffers 16 32k;
proxy_busy_buffers_size 64k;
proxy_temp_file_write_size 64k;
proxy_connect_timeout 30s;#in case image cache is not generated yet (drupal is generating them on first access, send request to apache
proxy_redirect http://mysite.com:81 http://mysite.com;
proxy_pass http://localhost:81;
proxy_set_header Host $host;
proxy_set_header X-Real-IP $remote_addr;
proxy_set_header X-Forwarded-For $proxy_add_x_forwarded_for;
}
location ~ /\.ht {
deny all;
}location / {
client_max_body_size 1000m;
client_body_buffer_size 128k;
proxy_send_timeout 90;
proxy_read_timeout 90;
proxy_buffer_size 4k;
proxy_buffers 16 32k;
proxy_busy_buffers_size 64k;
proxy_temp_file_write_size 64k;
proxy_connect_timeout 30s;
proxy_redirect http://mysite.com:81 http://mysite.com;
proxy_pass http://localhost:81/;
proxy_set_header Host $host;
proxy_set_header X-Real-IP $remote_addr;
proxy_set_header X-Forwarded-For $proxy_add_x_forwarded_for;
}
#this file should exist on your disk, it will be shown in case apache is overloaded and nginx is not able to ping it
error_page 403 /misc/mysiteovercapacity.htm;
error_page 502 /misc/mysiteovercapacity.htm;
error_page 503 /misc/mysiteovercapacity.htm;
error_page 504 /misc/mysiteovercapacity.htm;
}
So, in case you have more than one site running on the server, you’ll have to create a separate configuration file for every site (otherwise all of them will go to 00-default-nginx and it won’t bring any value, just on the contrary – additional layer when delivering content).
Enjoy!


Where should the error files exist on your disk? Webroot from your site,nginx root,…..? Can’t find decent info…
You can actually configure where nginx puts error.log file. This is how you do it:
error_log /var/log/nginx/error.log; #error log location
– that usually goes in nginx.conf file. If you have more than one site running on one server, then separate error.log can be configured for every site, the configuration is done for each domain separately. If a domain does not have personal configuration, the main one (from nginx.conf) is applied.